Protecting Sensitive DocuSign Data
What You Need to Know
If you need to include sensitive information on a DocuSign form, please follow these guidelines to ensure the security of the information being shared.
- Hidden Text Fields – Sensitive data is replaced with asterisks
- Access Codes – Authentication that requires anyone viewing/signing a document to have an additional code before DocuSign will open the document.
Who Has Access
- Students
- Faculty
- Staff
What You Need to Do
Use Hidden Text Fields
This will replace the data entered with asterisks for any other viewers of the document other than the document owner (the person that sent the envelope) and the person that entered the data. Here is the DocuSign article on how to use hidden text.
How to Hide Text
In an envelope or template, you can set a property on any text field to hide the field data.
- In your envelope or template, place a text field on your document.
- Select the text field to open the properties panel.
- Expand the Formatting section.
- Mark the formatting option Hide text with asterisks.
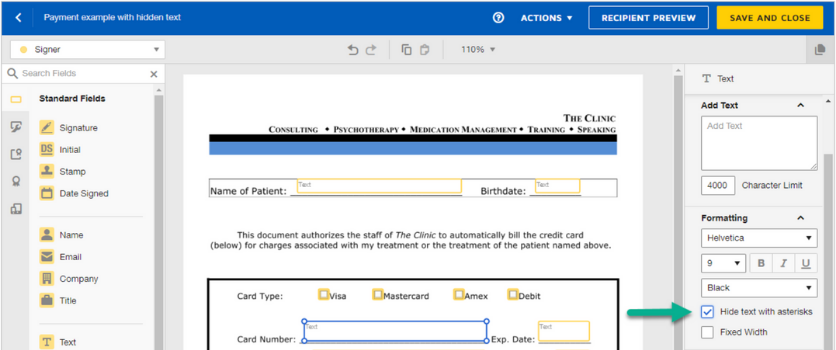
- (Recommended) In the Data Label field property, replace the default value with a meaningful name. For example, "Card Number." This label is used to identify the hidden field data when you view or download it later.
- Finish adding the rest of your recipient fields and send your envelope or save your template as usual.
Note: Any data entered in the text field will be replaced with asterisks. The data will be concealed in the signing session and on the in-process and completed PDFs. The sender can view or download the form data for the envelope to reveal the hidden data.
Use Access Codes
Add access code authentication that requires anyone viewing/signing a document to have an additional code before DocuSign will open the document. Here is the DocuSign article on how to create/use access codes:
To add an access code for a recipient
- Add a recipient to a new document.
- Select MORE and select Add access authentication.
- Select Access Code in the authentication drop-down and enter a code using alphanumeric and special characters.
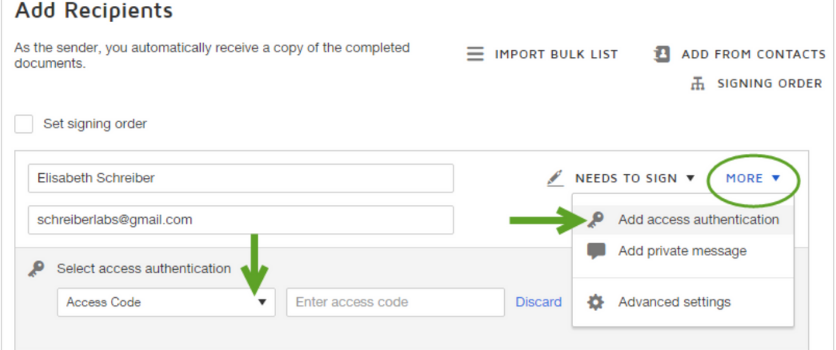
- Provide the code to your recipient. You can relay the code in any way that you wish, such as by phone or in a separate email communication.
Note: Do not include the code in the document message, as this would reduce the security value of the code. When you send your document, the recipient must provide the access code in order to open the document.
Cost & Resources
No cost for approved SJSU faculty and staff.